2D with the API you know
Sprites, Graphics, Text and Containers, with filters and masks. Any display object takes pointer events
through eventMode.
html2app turns your exported Pixi build into a signed APK or AAB. Keep your sprites and UI, add a 3D scene on the same stage, and publish without Android Studio or native code.
 Pixi 3D is in open beta. Its API can still change before the 1.0 release.
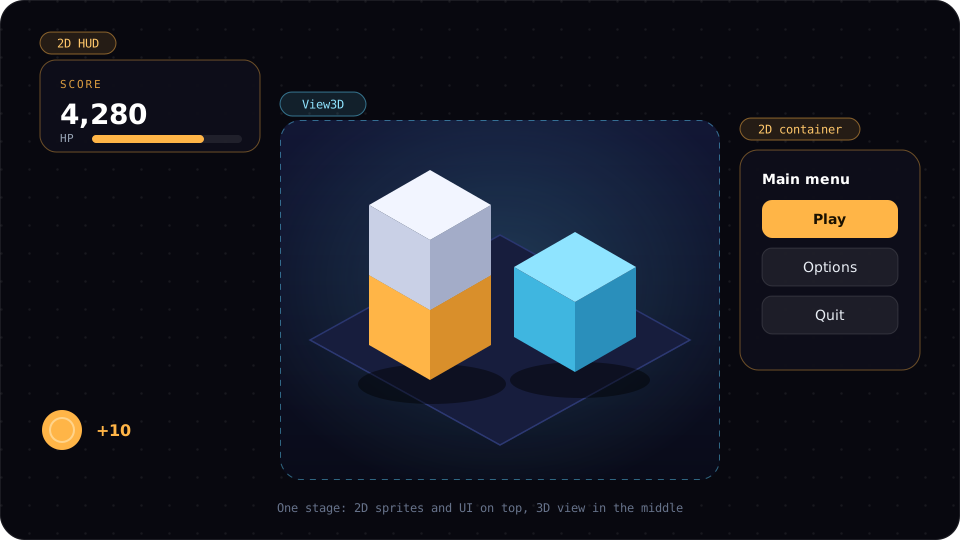
01 One stage
A 3D scene is a display object. Add it anywhere in a 2D scene, the same way you add a sprite.
Sprites, Graphics, Text and Containers, with filters and masks. Any display object takes pointer events
through eventMode.
Add a View3D to the stage. Build meshes with PBR materials, add lights with cascaded
shadows, and load glTF or GLB models through Assets.
Put a 2D HUD over a 3D scene, or draw a 2D container onto a 3D surface. 3D objects take the same pointer events as sprites.
02 2D
Create an application, load textures with Assets, and build scenes from
containers and sprites. Pixi batches draw calls for you, so a simple scene stays fast without extra setup.

app.init with resizeTo: window fills the screen. Assets.load returns a promise for textures, sprite sheets and models. eventMode = 'static' turns any display object into a button. app.ticker passes deltaMS, so motion matches on every frame rate.import { Application, Assets, Sprite } from 'pixi.js';
const app = new Application();
await app.init({
resizeTo: window,
resolution: Math.min(window.devicePixelRatio, 2),
autoDensity: true,
background: '#0b0b12',
antialias: true,
});
document.body.appendChild(app.canvas);
const texture = await Assets.load('coin.png');
const coin = new Sprite(texture);
coin.anchor.set(0.5);
coin.position.set(app.screen.width / 2, app.screen.height / 2);
coin.eventMode = 'static';
coin.cursor = 'pointer';
coin.on('pointerdown', () => {
coin.scale.set(1.15);
});
app.stage.addChild(coin);
app.ticker.add((ticker) => {
coin.rotation += 0.002 * ticker.deltaMS;
});import { Application } from 'pixi.js';
import { CubeGeometry, DirectionalLight, Material3D, Mesh3D, PlaneGeometry, View3D } from '@pixi/3d';
import { OrbitCamera } from '@pixi/3d/extras';
const app = new Application();
await app.init({
preference: 'webgpu',
resizeTo: window,
antialias: true,
background: 0x0b0b12,
resolution: Math.min(window.devicePixelRatio, 2),
autoDensity: true,
});
document.body.appendChild(app.canvas);
// A View3D draws a 3D scene. Add it to the stage like a sprite.
const view3d = new View3D({
autoResize: true,
shadowQuality: 'high',
environment: { skyColor: 0xc9d6ff, groundColor: 0x3a2f45, intensity: 0.6 },
});
app.stage.addChild(view3d);
const sun = new DirectionalLight({ color: 0xfff4e0, intensity: 3, castShadow: true });
sun.position.set(-3, 5, 2);
view3d.root.addChild(sun);
sun.lookAt({ x: 0, y: 0, z: 0 });
const floor = new Mesh3D({
geometry: new PlaneGeometry({ width: 8, height: 8 }),
material: new Material3D({ baseColor: 0x888888, roughness: 0.85 }),
castShadow: false,
});
floor.rotation.x = -Math.PI / 2;
view3d.root.addChild(floor);
const cube = new Mesh3D({
geometry: new CubeGeometry({ width: 0.8, height: 0.8, depth: 0.8 }),
material: new Material3D({ baseColor: 0xdd4444, roughness: 0.5 }),
});
cube.position.y = 0.4;
view3d.root.addChild(cube);
view3d.camera.position.set(3, 3, 5);
new OrbitCamera({
view: view3d,
target: { x: 0, y: 0.4, z: 0 },
enableDamping: true,
minDistance: 2,
maxDistance: 15,
});
app.ticker.add((ticker) => {
cube.rotation.y += 0.5 * (ticker.deltaMS / 1000);
});03 3D
Install @pixi/3d next to pixi.js 8.23.0 or later, add a
View3D to the stage, and build your scene inside its root.
glTF and GLB models load through Assets. PBR, Phong, flat and toon materials, or your own shader. Directional lights with cascaded shadows, post-processing and particles. BatchedMesh3D draws tens of thousands of copies from one node. OrbitCamera drags to orbit and pinches or scrolls to zoom.04 Mobile
Pixi drives the phone's GPU directly, so most of the work is in resolution, the page around the canvas, and testing on real devices.
Use Math.min(window.devicePixelRatio, 2). A 3x screen then draws fewer than half of its
physical pixels, and text stays sharp.
Stop the page from scrolling or zooming under the canvas. Orbit controls need this, because wheel and pinch events otherwise scroll the page too.
preference: 'webgpu' uses WebGL2 on devices without WebGPU. If a GPU lacks a WebGPU
feature that 3D needs, app.init throws instead of falling back. Catch that error and create
a new application with preference: 'webgl'.
Serve your build over Wi-Fi with five-server, the dev server by @yandeu, and open the Network URL on your phone. During the 3D beta, some Android phones hit WebGL2 uniform limits and drew an empty scene.
import { Application } from 'pixi.js';

const app = new Application();
await app.init({
  preference: 'webgpu', // WebGPU where available, WebGL2 elsewhere
  resizeTo: window,
  resolution: Math.min(window.devicePixelRatio, 2),
  autoDensity: true,
});html, body {
margin: 0;
height: 100%;
overflow: hidden;
}
canvas {
display: block;
touch-action: none;
}npm install -g five-server
five-server --root=dist --host=0.0.0.0 --no-browser05 Pricing
One simple plan: build and publish as many Pixi games as you want to Google Play. There is a free tier to get started, and no credit card is needed.
Need more? Compare every plan on the main pricing page.
Unlimited apps and games, no per-app fees Signed APK and AAB, ready for Google Play Cloud builds, no Android Studio Your signing key and app ID, no lock-in06 FAQ
Still have questions? Ask in the community on GitHub, share what you are building, and get help.
Join the discussionpixi.js. Add @pixi/3d only when your game
uses 3D.
preference: 'webgpu'.
.gltf) and binary glTF (.glb), loaded through Assets.
Convert your first game for free. No credit card and no native code.